


Many boat items have been around a long time. I’m not talking about the forgotten bag of limes in the bottom of the icebox/fridge. Rather, things like cleats, blocks, teak’n’holly sole, tillers and wheels. These have existed on boats for centuries in essentially their present form, because they work well and look pretty. Despite occasional refinements, any of these items would be instantly recognizable to someone from the past, if you time-traveled back a hundred years.
Consider now the cigarette lighter socket. It was originally designed to perform one function: heat a wire coil glowing-hot to light your cigarette. For that purpose it needed to make a temporary electrical connection to the coil of wire. A low-resistance connection was unimportant (in fact, high electrical resistance is what creates the heat). Also unimportant was vibration and accidental pull-out; the lighter only needed to remain inserted for the handful of seconds it took to heat up. Over the last couple of decades, with the proliferation of 12V and 5V electronic accessories, these lighter sockets are still installed in almost all vehicles, but very few of them are now used for their original purpose. Turning them into electrical supply connections for your electronics creates several serious problems – ones which didn’t exist in their original use.
The first problem is that the center terminal is a spring plunger mating face-to-face with a flat metal surface. This was not designed to be a low-resistance connection; contaminants build up and lead to poor electrical contact. The usual way most connectors deal with dirt and corrosion is to wipe it off automatically each time the connection is made and unmade. Two common examples are household AC outlets and USB connectors. Their contacting metal surfaces slide across each other when the connection is made. This sliding, or wiping action, keeps the area free of corrosion and dirt, so it remains low resistance. The lighter socket center contact lacks this sliding action, unless you wiggle the lighter plug, a technique many of us have used to ‘fix’ a bad connection. Besides causing lower voltage to your device, the high resistance also heats up the connector. If you have plugged in high current devices, such as an incandescent floodlight, you may have noticed the lighter socket becoming warm or even hot after several minutes of use.
The second shortcoming is susceptibility to vibration and accidental pull-out. I’m sure many folks have plugged a device into their lighter socket, only to discover later that the plug had shifted slightly and was now not making contact. A few manufacturers, like Blue Sea, have modified lighter sockets for added retention force, but these are of limited benefit since some only work when mated with the matching socket/plug combination, and others require a manual twist-to-lock.
The third deficiency is that the open lighter socket is large enough that common foreign objects can be inserted and cause a short. Just imagine, for example, a kid with scissors…
I’d like to describe our experience with a better alternative. Anderson Power Pole connectors address the lighter socket shortcomings by featuring:
- wiping connections that provide clean metal-to-metal contact
- a design with a predictable pull-out force (3 or 5 lbs, per contact, depending on the model)
- large surface area contacts, lowering resistance and increasing current capacity
- connector housings with a plastic barrier/wall and small openings, so they can’t be shorted out easily
In addition to addressing the shortcomings of lighter sockets, Power Pole connectors also:
- are smaller than lighter plugs/sockets
- employ tin-plated and silver-plated contacts rated for 1500 and 10,000 connect/disconnect cycles, respectively. This is when the circuit is off; their performance under load is good too, bearing UL/CSA approval for 250 cycles at 45 Amps at 72 Volts.
- connector housings come in various colours, so you can use different ones to more easily distinguish which device is being plugged in.
How did these connectors come about? Radio-control enthusiasts and mobile amateur radio operators (both users of battery packs in the field) needed a reliable connector, one that could be keyed to prevent accidental connection of incompatible voltages, was suitable for many connect/disconnect cycles, able to handle high currents, and that could be field-assembled.
To upgrade your vessel’s 12V outlets, you will need to install one or more Power Pole sockets, and then replace the lighter plug on accessories you want to use with the new system. I’d recommend leaving existing lighter sockets in place, as they are still convenient for light-duty use such as phone chargers. To install a socket, you can either assemble your own as described below, or purchase a ready-made power panel that already includes one or more Power Pole connections.
I mentioned earlier that the connector housings come in many colours (black, red, orange, yellow, blue and green are commonly available). This is just one of the features that can be used to ensure only compatible equipment is plugged in. A second feature is that the housings can be clipped together in stacks, and these groups will only mate with identically-configured stacks. Over time, a few conventions have developed in the radio community: the one most relevant to us is “Red-Right, Tongue-Top”, which designates a 12V connection with Red (positive) to the right of Black (negative) when viewed with the contact tongue facing up. You are free to configure your equipment however you want, but if you want to be inter-operable with others (e.g. you’d like friends to be able to plug their laptop-charger in on your boat), and if you want to be able to use commercially available accessories, you should probably stick with this convention.

The minimum items needed to build a Power Pole socket are a pair of plastic housings (one red and one black, most likely), and a pair of crimp terminals. You may also want to make a bezel, or front panel, that the socket can be mounted to. In the photo, you can see a small square of white plastic in which I cut a rectangular hole for the connector to protrude from, which is then screwed to a wood bulkhead. Start assembly by crimping each terminal to a wire from your electrical breaker/fuse panel, one for positive 12V and one for negative. Insert the terminals into the housings and push until they snap into place. Clip the two housings together in the orientation you want (recall the “Red-Right, Tongue-Top” convention mentioned earlier). Then glue the housings into your bezel (3M 4200 works well), or directly onto your bulkhead. That’s it! You can see the two sockets installed on Hoku Pa’a.

You will then need to replace the lighter plug on whatever accessories you want to plug in. Snip off the lighter plug, and determine which of the two wires is positive and which is negative. You can use a multi-meter: the center contact of the lighter plug will have low resistance to the positive wire, while the outer ring of the plug will have low resistance to the negative wire.
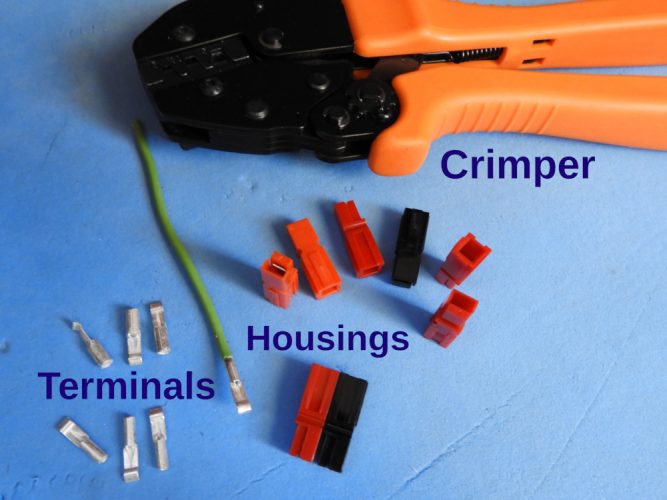
Items needed for making a new connector
Crimp a terminal onto each wire, and insert the terminals into the appropriate coloured housing (red for positive, black for negative). You are then finished, but if the wires will be subject to frequent bending you you may wish to add a strain-relief where they exit the connector.
 .
.
How do you know what terminals to use? Terminals are available in crimp and solder versions, fitting wires from AWG 20 to AWG 10 (0.75 mm^2 to 6 mm^2). Crimping is easier than soldering, and the tool shown in the photo above accommodates three common terminal sizes: 10 AWG (called 45 Amp contacts), 12 AWG (30 A contacts), and 16 to 20 AWG (15 A contacts). You choose the size appropriate for the wire you are using. All three terminal sizes fit into the same plastic housings (called PP15-45 series), and mate interchangeably with each other. There are also terminals for wires up to 3/0 AWG (85 mm^2) carrying up to 180 Amps, but note that they are part of a different connector series (PP75, PP120, PP180) and will not mate with the PP15-45 series.
As with the old-school lighter plugs, manufacturers have designed add-ons to the Power Pole system for specific purposes:
- Water-resistant boots can shroud the connectors to provide a degree of splash protection.
- Ready-made panels with internal bus-bars and multiple connections on the front face make upgrading your boat to use the PowerPole connectors pretty easy.
- Mounting clamps provide an alternative to gluing connector blocks to a panel.
- Retention clips provide additional mechanical resistance against disconnection.

I’ll finish showing one of our new Power Pole outlets in use. I hope this information allows you too to take advantage of an improved 12V power distribution system. Should you wish to purchase Anderson Power Pole parts, you can get them via Amazon or eBay. Further product info and photos can be found on those websites, and also at https://powerwerx.com/anderson-power-powerpole-sb-connectors (link current as of March 2019). If you have any questions or comments, feel free to send them my way.


Comments