

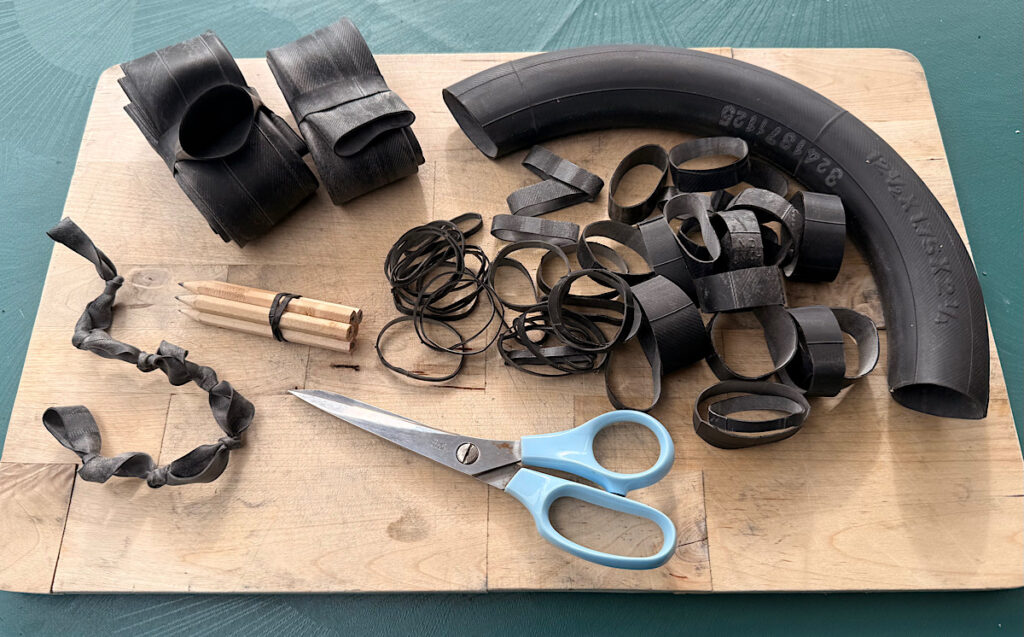
Let’s be honest. Ordinary rubber bands on a boat have the life expectancy of a bottle of rum in a bar full of sailors. A few weeks of tropical sun, a splash of salt water, and they turn into sad little crumbs that leave marks on everything. Bungee cords aren’t much better, often losing their snap after less than a season, becoming sad, limp spaghetti that can’t meet their original purpose, yet somehow manage to snag on everything. Ranger Bands, on the other hand, are their tough, rough-around-the-edges cousins made from inner tubes. They laugh at tropical heat, humidity and UV, shrug off salt, and keep working long after you’ve forgotten you put them there.
They’re generally known as Ranger Bands, supposedly because the US Army Rangers adopted them for securing their gear. Whether the Rangers invented them is another question; inner tubes considerably predate Special Forces. Best part? They cost almost nothing, require tools you already own, and can be made in less time than it takes to read this article.
The Budget Reality Check
A new pack or two of fancy commercial office elastics and a fistful of bungee cords can set you back more than a marina coffee and will still fail you. A used bicycle inner tube? Free if you ask nicely at a bike shop (they throw them out by the dozen). Even a brand-new tube is cheap. One tube will yield scores of usable bands. Do the math and you’ll start feeling smug every time you reach for one instead of watching another office-grade rubber band or tired bungee self-destruct. The only real downside is limited stretch. Ordinary rubber bands stretch much farther; Ranger bands are happier with roughly twice their relaxed diameter and shouldn’t be expected to perform gymnastics.
Tools Required: (Spoiler: Almost None)
- A pair of sharp scissors (kitchen scissors work fine; surgical precision is optional).
- A damp cloth or rag for wiping. (Soap and water optional)
- That’s it. No power tools, no sewing machine, no marine-grade epoxy nonsense. If you can open a can of beer, you have the required skill set.
Technique: So Simple It’s Almost Embarrassing
- Acquire tube(s). Bike shops are the go-to. Wider mountain-bike or hybrid tubes are ideal; motorcycle tubes make heavier-duty monsters if you want to get fancy. If available for the asking, get a few different diameters.
- Wipe it down. Remove the worst of the talc and road grime. A quick rinse never hurts. Soap is optional (if you’re one of *those* people).
- Cut. Cut away and discard any old patches and the bit with the stem. Flatten the tube and cut across it to make rings. Width is your only real decision:
-
- Skinny (~¼ inch / 6 mm) for light duty
- Medium (~⅜–½ inch / 10–12 mm) for everyday heroics
- Fat (~¾–1 inch / 20–25 mm) for when you really mean business
Scissors usually give cleaner edges than a knife and reduce the chance of creating nicks that can later turn into a dramatic tear. A single, sharp, decisive cut without pause gives the best result. (Note: Using someone else’s sacred sewing scissors without permission can result in personal injury or worse. Choose your tools wisely.) Cut a selection of widths you think will be useful and leave about half of each tube intact so you can make whatever size you need later. One tube becomes a cheerful pile of multi-purpose rubber in minutes. At this point you should feel slightly ridiculous about how cheap and easy this is. Store them in a ziplock, mesh bag, or any container that isn’t already full of mystery shackles. They take up less space than the frustration they prevent.
Why They Survive the Tropics (and Your Neglect)
Inner-tube rubber was designed to be flexed, heated, cooled, and generally abused while being ignored. It tolerates tropical heat, humidity, salt and UV surprisingly well, and in our experience lasts vastly longer aboard than ordinary rubber bands or bungees. The crew on Avant can report the same bands still working after several seasons. Just keep using them until they give up, which takes a surprisingly long time. Replacing them is a snap.
Uses Aboard:
- Keep spare lines from turning into chaotic rats’ nests.
- Bundle tools so the Allen keys stay together and don’t try to mate with the box wrenches.
- Stop charts from unrolling, corral batteries, or temporarily lash a hose that has displayed an irritating inclination to wander.
- Use a ring hitch or lark’s head to attach a toggle and create quick loops for securing hoses and shore power cords.
- Daisy-chain them to make bungee-cord replacements. Use 316 stainless ‘S’ hooks or reuse the hooks from recently deceased (RIP) bungees for the ends. Link several bands end-to-end (loop them through each other with ring hitches or Lark’s heads) to create a custom-length, adjustable bungee-like elastic fastener.
They stretch, they grip, and they last. Perfect for one-handed operation while the boat is doing its usual impression of a washing machine.
Next time you’re near a bike shop, cadge a couple of tubes, spend five minutes with the scissors, and stock your boat up. Your future self – standing on a hot foredeck in the tropics, reaching for a band that still works while the last bungee cord quietly expires in the locker – will silently thank you.


 Currents PDFs


Excellent idea, Rob! In fact, I’m off to a bike shop today to source a thin type 10mm wrench for my alternator install. Now I’ll walk out of the shop with an inner tube as well! 🙂
Ask for two, since they’re free!
Yes, back in Atlantic Canada , the old tubes were patched with old tubes, and finally cut into bands and strips . Could be used to hold Lobster Claws shut from the trap into packing them.
Beach clean ups in Nova Scotia don’t find tubes, or ranger bands, BUT the newer lobster Claw elastic bands are found by the hundreds. Sigh, so yes, some merry timers get the sharp scissors and make a cut through and get 2 or 3 thinner ones, that stretch a bit…. It is Free , And then, when they do snap, like similar synthetic plastic stuff they need to be safely recycled somewhere.