

As bluewater cruisers, we venture far from the safety nets of coastal waters, where self-reliance isn’t just a mindset – it’s our reality. In the vast expanse of the ocean, emergencies can escalate rapidly, from a man overboard to a sudden fire or a need to send a distress signal in the dead of night. That’s where “staging” your safety equipment comes into play. Staging isn’t merely storing gear. It’s about strategically positioning, enhancing, and preparing items for immediate, effective deployment. By adding simple modifications like reflective tape, lights, whistles, and lanyards, you transform standard equipment into lifesaving tools optimized for the real-world chaos of extreme events.
In this article, I will discuss some common safety gear – flares, electronic flares (eFlares), Lifesling-style rescue collars, heaving lines in throw bags, fire extinguishers and man overboard poles – focusing on practical staging ideas and techniques. These insights draw from our and other seasoned cruisers’ experiences and align with standards like those from the ISAF offshore sailing regulations, the International Maritime Organization (IMO), and other authoritative sources such as US Sailing’s Safety at Sea program and The Sailing Foundation (developers of the original Lifesling® system), ensuring your setup is effective, compliant and quick to use.
The Fundamentals of Staging: Accessibility, Visibility, Security, and Maintenance
Before diving into specifics, remember the core principles of staging:
- Accessibility: Gear must be identifiable and reachable in seconds, even in rough seas or low light. Mount or store items near high-access areas like the cockpit, companionway, galley, or navigation station. Gear should be secured such that it will not move from its allotted spot in rough seas or get bumped out of place.
- Visibility: Use labels, glow-in-the-dark markings, or SOLAS tape (high-intensity reflective material that shines under searchlights) to make equipment stand out. Where appropriate, add water- or manually-activated lights.
- Security: Attach lanyards or clips to your items, to prevent loss of gear overboard. That nice new eFlare will not be much use if it rolls off the deck and floats away.
- Maintenance: Regularly inspect for expiration dates (e.g., flares, batteries in battery powered equipment) and reduced functionality. Set reminders in your phone’s calendar app for expiry dates. Check equipment for wear and tear, and aging from sun/UV exposure.
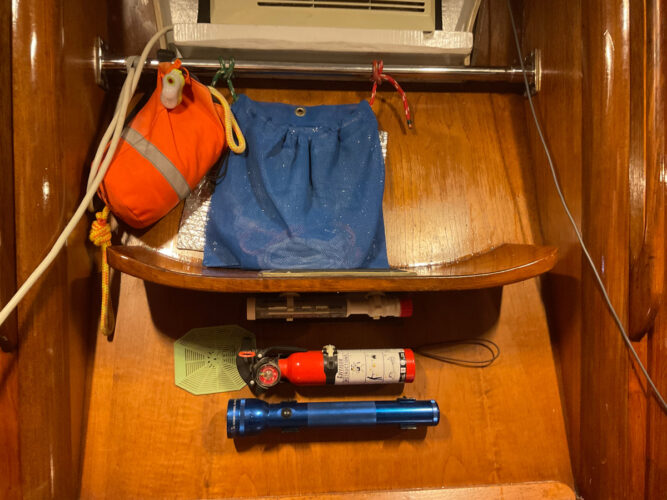
Avant’s companionway, with a heaving line, white collision avoidance flare, small fire extinguisher, and flashlight, all instantly visible and available.
The international standard for EPIRBs is a useful example. All EPIRBs have an integrated light, an integrated lanyard, a secure wall-mountable storage system or automatic water activated storage, easy to check expiry dates, and are marked with SOLAS tape.
Staging starts with an inventory audit: list your gear, note storage locations, and create a quick-reference chart to post in the saloon or at the navigation station. In an emergency, it is easy for you or your crew to forget exactly where that gizmo is.
Item by Item
Now, let’s break it down by item.
Flares and eFlares: Signalling for Help
Pyrotechnic flares and their modern electronic counterparts (eFlares) are your lifeline for attracting rescuers. Traditional flares expire after a few years, while eFlares offer reusable, battery-powered LED distress signals that are compliant with most national regulations (if you keep the batteries fresh). We carry both aboard Avant.
Staging Tips
- Store pyrotechnic flares in a dedicated, waterproof grab bag, waterproof case, or locker in or near the cockpit for instant access. Label the container clearly. Add a lanyard and a snap to the container so you can secure it on deck, in the cockpit, or clip it to your PFD harness. Position the bag/case on a quick-release mount to grab and go (a simple quick release buckle on a strap screwed to a strong point will do).
- For eFlares, store them in some form of clearly labelled case, bag, or mount so they will not get damaged rolling around, cannot accidentally activate, and won’t shift out of place in rough seas and be hard to find when you need them. Most eFlares come with a distress flag as a daytime signalling device: the ties for the four corners of the flag are often woefully short and usually not attached to the flag as shipped, so obtain and attach appropriate tie-downs before you stow it (you don’t want to be looking for bits of string to secure it if you need to deploy it in a hurry). The flags themselves are often flimsy, so consider adding a spare or two.
Enhancements
- Apply SOLAS tape strips around flare bags/cases or eFlare housings to make them visible if dropped at night.
- Attach a high-decibel whistle via a short lanyard – whistles are lightweight, cheap, don’t expire, and can signal nearby rescuers without depleting flare supplies.
- Add a lanyard to an eFlare so you can secure it in place when deployed (paracord with reflective traces makes for a good lanyard).
- Add a pair of sturdy leather gloves in the case/bag with traditional pyrotechnic flares to protect users’ hands.
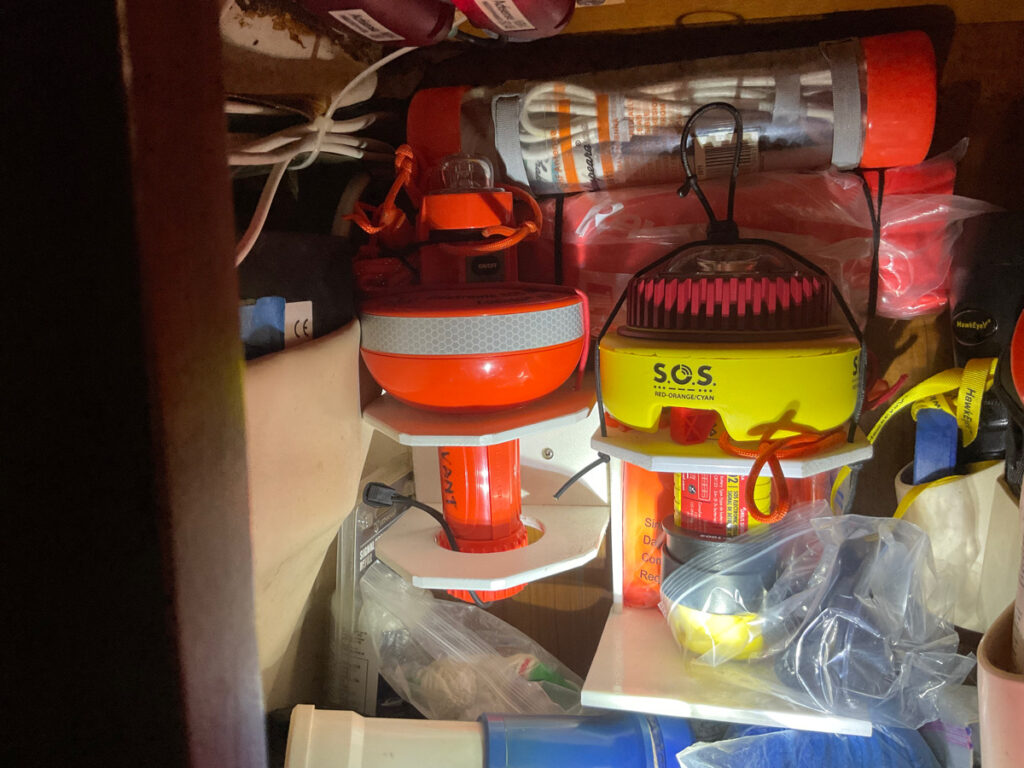
The lead photo shows Avant’s two eFlares, one US coast guard approved (longer useful life), and one that is both US Coast Guard and Canadian Coast Guard approved (shorter useful life, but brighter and IR visible). Each is in a custom built mount with a shock cord ‘seatbelt’, and lanyard and whistle attached.
Lifeslings: Man Overboard Recovery
The most common rescue collar is the patented Lifesling®, developed by The Sailing Foundation and widely endorsed by US Sailing’s Safety at Sea program. This, and the many different copies of the design (which sell under other names) remain one of the most effective and compact tools for man-overboard (MOB) recovery in offshore conditions. It provides flotation via a horseshoe-shaped buoyant sling, connected to the boat by ~150 feet of floating polypropylene line, allowing a single crew member to rescue a victim by bringing them alongside and potentially hoisting them aboard.
Staging Tips
- Mount the Lifesling storage bag prominently on the inside of the stern pulpit or pushpit, as recommended in The Sailing Foundation guidelines. Ensure the bag is mounted with the opening accessible for an easy one-handed throw or drop. The line should be ‘stuffed’ or flaked inside with no tangles, so it will pay out smoothly when the sling is deployed. Close the bag or case so the sling is not exposed to the sun (paying attention to any internal flaps), as it will age quickly from too much UV exposure. The bitter end of the sling’s recovery line must be attached to a solid fitting on deck, and that attachment should be secure (seize the knot) so it can’t come adrift.
Lifesling Preparation and Setup Best Practices
(drawn from The Sailing Foundation’s Owner’s Preparation Guide and US Sailing Safety at Sea resources)
- Inspect and Repack Regularly. Periodically open the bag to verify the line deploys freely; practice tossing it on the dock or in calm water during drills to confirm no snags. Check for UV degradation (fading, brittleness) or weakness on the line, webbing, stitching, and horseshoe float. Any degradation requires full replacement. Repack by feeding the line back smoothly without twists to prevent kinks. Think of it like a parachute: if you don’t pack it well, it’s useless.
Custom Enhancements:
- Size and seize the ‘closing loop’ on the sling (the one that goes through the lifting rings) to match your vessel’s freeboard, to make it easier to grab the line and attach to a halyard or other lifting mechanism.
- Add figure eight knots every 24 inches or so along the last 10-15 feet of the line (starting from the sling end) for better grip during hauling and a tactile confirmation you are getting close when hauling it in.
- Apply reflective SOLAS tape generously around the horseshoe for nighttime visibility.
- For night use, attach a water activated light to the end of the sling that will face the boat when it is towed (not in the light pocket on the back of some models, the designers now admit that was a design flaw).
- Add a webbing loop, line, or adjustable strap to the attachment rings on the sling (about same length as the sling) to support under arms and knees simultaneously for safer lifting; secure these with seizing or stitching.
- Clip a whistle to the sling’s webbing for signalling by the victim. Attach with a lanyard to keep the whistle from slipping away.
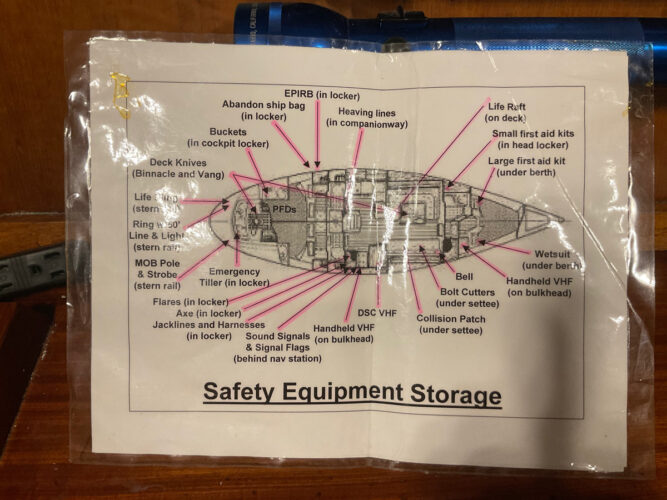
Equipment map: have an easy to access reference of where to find emergency equipment.
Man Overboard Poles (Dan Buoys or MOB Markers): Marking the Position
A man overboard pole – often called a Dan buoy – is a tall, buoyant marker (typically 5-9 feet high) with a flag (code flag “O”), sometimes a light, and sometimes a drogue, designed to create a highly visible reference point in the water. It dramatically improves the chances of finding a person in waves, especially when the initial sighting is lost. Traditional rigid poles (e.g., Forespar, Scotty) are ballasted and flag-topped, while inflatable versions (e.g., SOS Dan Buoy or Switlik MOM 9) deploy via a pull cord or water activation for more compact storage. ISAF and US Sailing’s Safety Equipment Requirements often mandate a MOB pole or equivalent (including self-inflating devices) for offshore categories, emphasizing immediate deployment to “litter the water” with visible aids to mark the location of a MOB.
Staging Tips
- Mount the pole on the stern rail, pushpit, backstay, or arch for instant access from the helm or cockpit—within reach for quick release. For rigid poles, secure vertically with quick-release clips or lashings to avoid obstruction while allowing one-handed deployment.
- Inflatable models store in a compact canister mounted near the Lifesling or throwable gear; ensure the activation handle or pin is accessible and labeled “MOB MARKER – PULL TO DEPLOY.”
Preparation and Setup Best Practices
(gathered from US Sailing, ISAF Special Regulations, and cruiser experiences)
- Inspect Regularly: Check for UV damage on the pole, flag, reflective tape, and line; test the light battery/activation (water or manual); verify the drogue deploys freely. For inflatables, inspect the CO2 cartridge and inflation mechanism—rearm or repack as needed (mock deployments help without full cost).
- Practice throwing or dropping during drills to ensure tangle-free release.
Custom Enhancements:
- Apply generous SOLAS reflective tape to the pole shaft (applying like a barber pole stripe works), flag, and/or flotation base for superior nighttime visibility. Add a whistle attached via lanyard to the float for audible signalling if the victim reaches it.
- For rigid poles, add a lanyard or tether along the lower section so a MOB can grab the pole and keep contact with it if they reach it.
Light and Drogue Integration
- Ensure a self-igniting or water-activated strobe is mounted high or attached; add fixed white lights if needed for redundancy. A drogue stabilizes the pole in wind and current. Without a drogue, the pole will drift at a different speed than the MOB (the pole has a lot more windage than a person in the water), defeating its purpose.
- If you have more than one device (e.g. multiple MOB poles, an MOB pole and a life ring, etc.), consider different lights on each (i.e. one with a solid light, one with a strobe/flashing light) so that when they are both deployed they form a range, and you can tell one end of the range from the other at night.
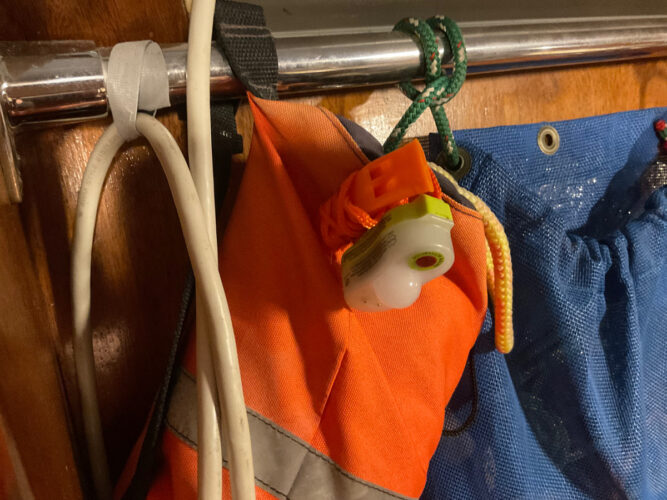
A HemiLight water activated light and whistle attached to a heaving line’s case.
Heaving Lines in Throw Bags: Precision Rescue Throws
Heaving lines – lightweight ropes in compact throw bags – are essential for pulling someone alongside without entering the water yourself. They are compact but extremely useful when staged correctly. Unlike a Lifesling, they can be tossed some distance.
Staging Tips
- Secure throw bags to lifelines, stanchions, or cockpit coamings for instant access. Ensure there is a secure loop at each end of the line (one for the thrower to hold onto, one for the catcher to grab).
Enhancements
- Add SOLAS tape to the bag’s exterior for better spotting at night. Attach a whistle to the bag’s handle. Attach a water activated light for use at night
- Opt for bags with 70-75 feet of floating line, at least 5/16 – 3/8” (lighter line is punishing on the hands). Consider staging multiple bags: one for immediate use, another as backup.
Fire Extinguishers: Containing Onboard Blazes
Fires at sea are terrifying, often starting in the galley or engine space. Dry chemical extinguishers (ABC-rated for multiple fire types) are standard, but staging amplifies their effectiveness.
Staging Tips
- Mount extinguishers in brackets at key spots: one in the galley, one near the engine, and at least one in the cockpit. Ensure they’re upright, highly visible, and have pins that are easily removable even with cold or wet hands. Stowing extinguishers in their cardboard boxes in a locker (and I have seen that done) slows access when you need it most.
Enhancements
- Apply SOLAS tape to the cylinder for quick location in smoke-filled cabins.
- If the ring seems small, consider adding a lanyard to the pin for one-handed operation.
- Stage a fire blanket in the galley, a quick and easy fire suppression tool useful for most galley fires.
- Buy quality. In a recent fire aboard a catamaran in the San Blas Islands, their (brand new) Colombian purchased/Chinese manufactured extinguishers did not work at all.
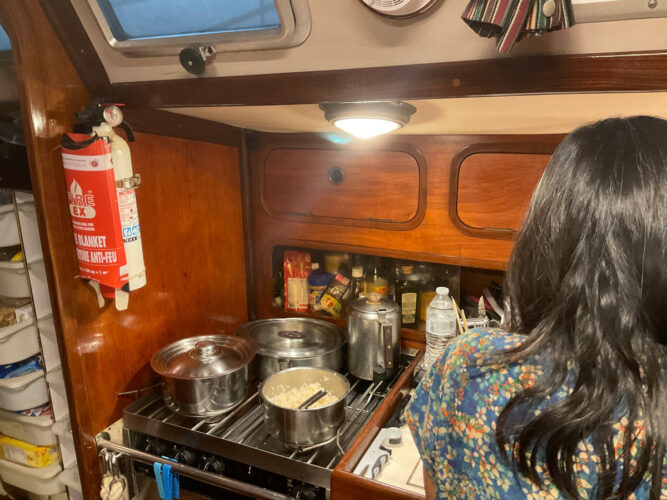
Avant’s galley showing the prominent fire extinguisher and fire blanket.
Final Thoughts: A Culture of Preparedness
Staging safety equipment is not a one-time task – it is an ongoing commitment that could mean the difference between a narrow escape and catastrophe. By using thoughtful storage and mounting locations, incorporating SOLAS tape and lights for visibility, whistles for signalling, and lanyards for security – plus targeted prep like regular inspections and enhancements from trusted sources – you elevate your gear from passive storage to active defence. As cruisers know, bluewater rewards the prepared (or at least does not punish them as badly). Review your setup before every passage, involve your crew in drills, and share your innovations. Fair winds and may you never need to use what you have staged. But if you do, it will be ready.


Excelllent and thorough! Always great information from your articles!
Thanks so much!